Power Settings for Helse Tips
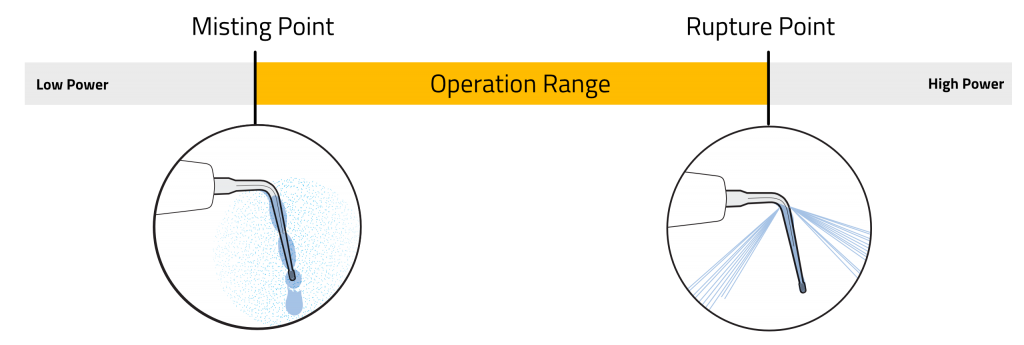
There are many different ultrasonic units on the market, each one with specific characteristics that may result in different power transmission to the ultrasonic tip. Each model of ultrasonic tip also behaves slightly differently. Therefore the operation range needs to be identified for each unit and tip model combination.

Power Settings Examples
Each tip will perform differently with each ultrasonic unit according to it’s power profile. Choose a Tip Below to see video examples.


 Power Profile
E6D Pear Diamond
1- Ensure Water Flow
- Turn your unit on and make sure its water port is set to flow
- Set the power at the lowest level and activate the foot switch - water should drip from the tip
2 -Find Misting Point
- Increase power until you start to see a mist
- Take note of the power setting at the Misting Point
3 - Find Rupture Point
- Keep increasing power until the mist breaks into a wide angle water flow with
- Take note of the power setting at that Rupture Point
 Power Profile
E2D Conical Diamond
1- Ensure Water Flow
- Turn your unit on and make sure its water port is set to flow
- Set the power at the lowest level and activate the foot switch - water should drip from the tip
2 -Find Misting Point
- Increase power until you start to see a mist
- Take note of the power setting at the Misting Point
3 - Find Rupture Point
- Keep increasing power until the mist breaks into a wide angle water flow with
- Take note of the power setting at that Rupture Point
 Power Profile
R1 – Flatsonic
1- Ensure Water Flow
- Turn your unit on and make sure its water port is set to flow
- Set the power at the lowest level and activate the foot switch - water should drip from the tip
2 -Find Misting Point
- Increase power until you start to see a mist
- Take note of the power setting at the Misting Point
3 - Find Rupture Point
- Keep increasing power until the mist breaks into a wide angle water flow with
- Take note of the power setting at that Rupture Point
